Custom Layout
The ADM42 comes with several layouts out-of-the-box, allowing for easy selection without the need to reflash the firmware.
However, if your favorite layout is not available, you can easily add your own.
First, pull our repository and ensure you can build and flash the official firmware.
Then, edit keyboards/adm42/v2/keymaps/default/keymap.c
A custom layout entry (_CUSTOM) is already available in the source code. Once you configure it with your preferred layout, you can select it, like other layouts, from the System Layer.
const uint16_t PROGMEM keymaps[][MATRIX_ROWS][MATRIX_COLS] = {
    ...
    // Set your custom layout here!
    [_CUSTOM] = LAYOUT_3x12_6(
            LW_GRV,  KC_Q,    KC_D,    KC_R,    KC_W,    KC_B,    KC_J,    KC_F,    KC_U,    KC_P,    KC_SCLN, RW_EQU,
            LC_TAB,  KC_A,    KC_S,    KC_H,    KC_T,    KC_G,    KC_Y,    KC_N,    KC_E,    KC_O,    KC_I,    RC_QUT,
            KC_LALT, KC_Z,    KC_X,    KC_M,    KC_C,    KC_V,    KC_K,    KC_L,    KC_COMM, KC_DOT,  KC_SLSH, LOR_ALT,
                                       LLS_ESC, LS_BPC,  LLA_DEL, LLE_ENT, RS_SPC,  LLS_COMP
    ),
    ...
}
If you need to define new dual-function keys, please refer to the section below.
Dual-Function Keys
These keys are named using a specific nomenclature:
- L|R: Left|Right
- W|C|A|S: Super|Control|Alt|Shift
- Keycode (QMK nomenclature)
For example:
LW_GRV⇒ Left Super / GraveRC_QUT⇒ Right Control / Quote
The Special Layer has four non-dual modifiers (Super and Alt) that can be
easily turned in dual-function key, for example to repeat specific special characters on that layer.
The Function Layer has also four
non-dual modifiers (Control and Alt) that can be extended to a dual-function
key, for example to add non standard keys.
Creating a new Dual-Function key
To create a new dual-function key, start by creating a unique keycode following the existings ones in custom_keycodes:
enum custom_keycodes {
    ...
    LW_GRV,
    RW_DOT,
    LC_TAB,
    LS_BPC,
    RW_EQU,
    RC_QUT,
    RC_SCLN,
    RC_SLSH,
    RS_SPC,
    LW_F11,
    RW_F12,
    LC_CIRC,
    RC_DLR,
    LA_ZOUT,
    RA_ZIN,
    ...
}
Each dual-function key has an entry that describes the key:
typedef struct {
    // Config
    uint16_t mod;
    uint16_t tap;
    bool left; // Physical side on the keyboard, for Opposite MODs as TAP
    bool pending_mod; // If true, this mode is allowed to be pending
    uint8_t mods; // MODs that have to be added to the TAP
    ...
} modtap;
In the modtaps[] array, add the entry for your keycode at the appropriate position. The keycode should be in the same relative position as it appears in custom_keycodes:
static modtap modtaps[] = {
    ...
    // LW_GRV
    {.mod = KC_LWIN, .tap = KC_GRV, .left = true},
    ...
}
Numpad
For those who prefer a dedicated numpad, we offer an alternative firmware that extends the RGB Effects Layer.
In this firmware, the effects controls have been moved to the left side, while the right side functions as a numpad with numbers and math operations.
1, 2 and 3 are placed on the home row according to Benford's law.
Get the HEX file here.
QMK Configurator
The firmware version included in the QMK project is simplified and relies solely on standard QMK features. It lacks all the advanced functionalities such as context-aware dual-function keys, pending-MODs, system configuration, LED options, etc. QMK also doesn't support shifted symbols and combinations on dual-function keys.
Therefore, we recommend using our optimized firmwares. If your preferred layout is not included, you can still configure a custom one as explained in the previous section.
However, if you want to use a completely different logic and/or leverage other QMK features, you can build your own solution starting with the version included in the QMK project.
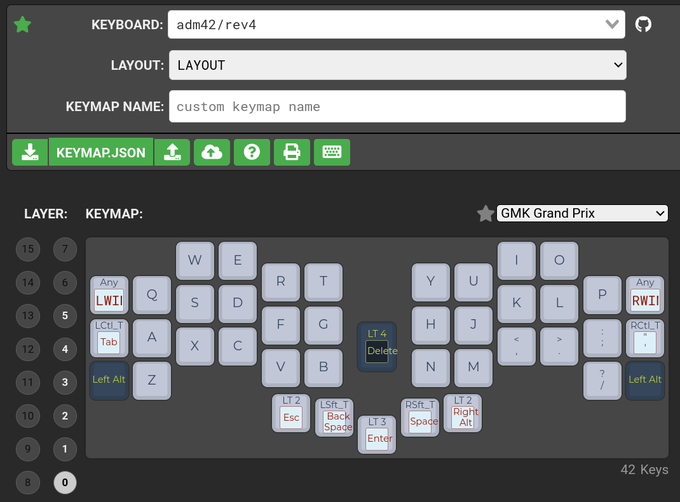
QMK provides a graphical configurator that generates HEX files, which can be easily flashed onto your keyboard.